

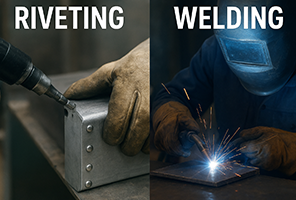
Introduction: Why Your Joining Method Matters
In the world of sheet metal fabrication, the choice between riveting and welding is a fundamental decision that echoes through the entire lifecycle of a product. This decision directly impacts structural integrity, production cost, maintenance schedules, and final aesthetics. While both are time-tested techniques, they serve vastly different purposes.
This definitive guide moves beyond a simple comparison. We will equip you with the technical knowledge and strategic framework to confidently choose the optimal method for your specific project, ensuring performance, cost-efficiency, and longevity.
Understanding Riveting - The Mechanical Fastener
Riveting is a semi-permanent mechanical fastening process that joins materials using a metal pin called a rivet. It does not rely on heat to fuse materials, but rather creates a strong mechanical lock.
The Riveting Process in Three Steps:
1. Preparation:
Precise holes are drilled or punched into the components to be joined.2. Insertion:
A rivet is inserted into each aligned hole.3. Deformation:
The tail end of the rivet is deformed (a process called "peening") using a hammer, rivet gun, or hydraulic press. This creates a second head, clamping the parts together securely.
Common Types of Rivets
Solid Rivets:
The most traditional type, known for high durability and strength. They require access to both sides of the assembly and are common in structural applications like bridges and aircraft.Blind Rivets (Pop Rivets):
Designed for situations where only one side of the assembly is accessible. A mandrel is pulled to expand the rivet body, creating a secure connection. Ideal for automotive manufacturing and construction.Tubular and Semi-Tubular Rivets:
Feature a hollow center for easier deformation. They are typically used in lighter-weight applications, such as in the assembly of fabrics, leather, or thin sheets.
Understanding Welding - The Metallurgical Bond
Welding is a permanent, thermal process that fuses materials, typically metals, by melting the base pieces and often adding a filler material. The molten material cools to form a continuous, unified joint.
The Welding Process in Three Steps:
1. Preparation:
Surfaces must be meticulously cleaned of rust, oil, or paint. Edges may be ground or beveled to enhance weld penetration.2. Welding:
Intense heat from an electric arc, gas flame, or laser melts the base metals and filler material, creating a shared molten pool.3. Cooling:
The molten metal solidifies to form a fused joint. The cooling rate must be controlled, as it affects the weld's strength and ductility.
Common Welding Methods for Sheet Metal
MIG Welding (Metal Inert Gas):
Uses a continuously fed wire electrode and shielding gas. It is favored for its speed and versatility, making it effective for thin sheets in automotive and fabrication industries.TIG Welding (Tungsten Inert Gas):
Utilizes a non-consumable tungsten electrode for exceptional control and precision. It produces high-quality, clean welds, making it suitable for stainless steel and aluminum.Spot Welding:
A resistance welding method where concentrated heat and pressure are applied to specific points. It is highly efficient for joining overlapping sheets and is a staple in automotive and appliance manufacturing.
Head-to-Head: Riveting vs. Welding Compared
This side-by-side comparison table highlights the core differences to help you weigh your options.
| Criteria | Riveting | Welding |
|---|---|---|
| Joint Nature | Mechanical, semi-permanent | Metallurgical, permanent |
| Strength & Load | Good for shear loads; limited in tension | Excellent strength in both shear and tension; creates rigid joints |
| Material Compatibility | Excellent for dissimilar metals (e.g., aluminum to steel) and heat-sensitive materials | Best for similar metals; challenging for dissimilar materials due to different melting points |
| Heat Impact | No thermal distortion or warping | High risk of warping, burn-through, and residual stresses, especially on thin metals |
| Aesthetics | Visible rivet heads; industrial appearance | Smooth, seamless finish possible after grinding/polishing |
| Sealing Property | Not inherently airtight/watertight; requires sealants | Excellent for airtight and watertight seams (e.g., tanks, pressure vessels) |
| Inspection & Rework | Easy visual inspection; rivets can be drilled out for repair | May require nondestructive testing (X-ray); difficult to rework without damage |
| Skill & Cost | Lower skill requirements; cost-effective for small runs | Requires skilled operators; higher equipment and labor costs |
| Weight Impact | Adds weight from rivets and possible reinforcement | No added fasteners; typically lighter joints |
How to Choose: A Decision Framework
Stop asking "Which is better?" and start asking "Which is better for my specific situation?" Use this framework to guide your choice.
Choose Riveting When:
- You are joining dissimilar or heat-sensitive materials like aluminum to steel, or thin, coated parts that would warp under heat.
- Future disassembly is required for inspection, maintenance, or repairs.
- The assembly environment is in the field with limited access to power or welding equipment.
- Vibration resistance is critical, as riveted joints can handle dynamic loads better in some applications (e.g., aerospace).
- Cost and speed are priorities for prototyping or simple structures.
Choose Welding When:
- Maximum joint strength and rigidity are essential for structural or load-bearing components (e.g., frames, chassis).
- An airtight or watertight seal is required, such as in tanks, pipes, or hulls.
- Aesthetics are a priority, and a smooth, seamless appearance is needed for the final product.
- Weight reduction is key, as welding adds no additional fasteners.
- You are working with high-volume production that can leverage automation.
The Hybrid Approach: Getting the Best of Both
In many complex projects, using both welding and riveting is the most optimal strategy. For example:
Reinforcement:
Use welds for primary strength in high-stress areas and rivets as secondary supports.Serviceability:
Weld the main frame for permanence, but use rivets to attach access panels that might need future removal.Prototyping:
Rapidly assemble and adjust a prototype with rivets, then transition to welding for the final production model for strength and aesthetics.
FAQ's about Riveting and Welding
Is welding stronger than riveting?
For static loads and tensile strength, welding typically produces stronger, more rigid joints because it fuses the materials into a single piece. Riveting provides good strength, particularly in shear loads, but is generally not as strong as a proper weld under tension.
Which method is more cost-effective?
It depends on the scale. Riveting often has lower upfront equipment and labor costs, making it cheaper for small runs and prototypes. Welding can be more efficient and cost-effective for high-volume production due to automation, despite higher initial setup and skilled labor costs.
Why are airplanes riveted and not welded?
Aircraft are primarily riveted because they are made from heat-sensitive aluminum alloys that would be weakened and distorted by welding. Riveting also allows for easier inspection and repair, as individual rivets can be replaced without compromising the entire airframe's integrity.
Can riveted joints be made waterproof?
Not inherently. Riveted joints require additional sealants or gaskets to be made waterproof. Welding, on the other hand, naturally creates a leak-proof seal.
Conclusion: Making an Informed Choice
The riveting vs. welding debate has no universal winner—only the right solution for your project's unique requirements. By understanding the technical trade-offs and systematically evaluating your needs for material compatibility, structural loads, aesthetics, and lifecycle maintenance, you can make a choice that ensures reliability, efficiency, and value.
Need help applying this to your specific project? Our fabrication experts are ready to help. Contact us for a free design-for-manufacturability consultation and quote.