

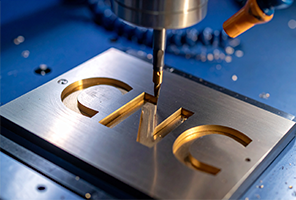
Text milling, also known as CNC engraving, is a precision manufacturing process that uses computer-controlled cutting tools to permanently carve text, logos, and numbers onto a workpiece. This technique transforms digital designs into durable, high-precision physical marks, making it indispensable for part identification, branding, and traceability across countless industries. Unlike temporary labels or ink, milled text is an integral part of the component itself, capable of withstanding harsh environments, wear, and cleaning processes.
What is Text Milling and CNC Engraving?
CNC text engraving is a specialized application of computer numerical control (CNC) machining. The process begins with a computer interpreting a text or image file and converting it into vector geometry—a series of lines and shapes that create a precise map for the cutting tool to follow. This vector data guides a rotating cutter to engrave the design directly into the material with exceptional accuracy and repeatability.
Why It Matters: Key Applications
From the serial number on an engine block to the logo on your smartphone, text milling provides permanent part marking that is critical for:
Product Identification:
Brand names and logos for brand recognition.Traceability:
Serial numbers, part numbers, and date codes for inventory and quality control.Compliance and Safety:
Legal markings, warnings, and instructional information required by regulations.Aesthetics:
Decorative elements and personalized designs on consumer goods.
Text Milling vs. Other Marking Methods
How does text milling compare to other popular marking technologies? The table below breaks down the key differences.
| Method | How It Works | Durability | Best For |
|---|---|---|---|
| Text Milling / CNC Engraving | A rotating physical cutter removes material to carve out the design. | Permanent, excellent resistance to wear, heat, and chemicals. | High-precision, durable marks on metals and plastics; functional parts. |
| Laser Engraving | A high-energy laser beam vaporizes or burns the material's surface. | High, but can be shallow and may not withstand heavy abrasion. | High-detail, speed, and non-contact marking; finer details on some materials. |
| Manual Stamping | A hammer or press forces a steel die into the material. | Permanent, but precision can be low and the process is inconsistent. | Low-cost, low-precision applications on strong materials. |
| Labels/Ink Marking | Applying stickers, pad printing, or silkscreen printing. | Low; can peel, wear off, or fade over time. | Adding color or marking uneven surfaces where permanence is not critical. |
Advantages and Disadvantages of Text Milling
Pros:
Integrated Finish:
The mark is part of the workpiece, not just a surface application.Long-Lasting:
Creates durable marks that can withstand harsh operating conditions.High Precision & Consistency:
The fully automated process ensures every part is marked identically.Deep and Tactile:
Allows for raised (embossed) or recessed (engraved) text with a physical presence.
Cons:
Skill-Intensive:
Requires a skilled CAM programmer and machine operator.Higher Cost and Time:
Can be more expensive and slower than laser engraving for large runs.Tool Wear:
Small engraving tools are susceptible to wear and breakage, especially on hard materials.Material Limitations:
Challenging on very hard or already-finished surfaces without damaging the finish.
Technical Design Guidelines for Text Milling
Success in text milling hinges on proper design. Following these guidelines ensures your text is legible, cost-effective, and does not compromise the part's integrity.
Font Selection: Clarity is Key
Use Sans-Serif Fonts:
Opt for fonts like Arial, Verdana, Helvetica, or Century Gothic Bold. These fonts lack the small decorative tips (serifs), which are often too thin for a cutting tool to accurately reproduce.Single-Line Fonts:
For small text like serial numbers, use single-line or "stick" fonts. They significantly reduce toolpath length and machining time.Avoid Serif Fonts:
Fonts like Times New Roman have fine serifs that can appear blurry or not mill at all.
Size and Depth: Ensuring Readability
Character Height:
A minimum height of 2.5 mm (0.1 inches) is recommended for good visibility. Many manufacturers suggest using a font size of 20 points or larger.Line Width and Cutter Diameter:
To achieve clean lines, use a cutter with a diameter about half of your intended line width.Cutting Depth:
A depth of ~0.3 mm is typically sufficient for clear visibility. A good rule of thumb is to avoid engraving deeper than 10% of the material's thickness to maintain structural integrity.
Raised vs. Recessed Text
Recessed (Engraved) Text:
The text is cut into the material. This is generally more cost-effective as it removes less material.Raised (Embossed) Text:
The material around the text is cut away, leaving the letters protruding. This offers better resistance to wear and can be more visually prominent.
Strategic Text Placement
Edge Clearance:
Keep text away from edges to prevent cracking from stress concentrations.Avoid High-Stress Areas:
Do not engrave in areas subject to high mechanical stress, as the grooves can act as stress risers and initiate cracks.Flat, Accessible Surfaces:
Place text on flat surfaces for consistent depth and ensure the location is accessible for the cutting tool.
The CNC Engraving Workflow: From Text to Part
Transforming a digital design into a physical engraving follows a structured CAM (Computer-Aided Manufacturing) process.
1. Create a Text Sketch:
Design the text, including font, size, and placement, using CAD (Computer-Aided Design) software.
2. Vectorize the Font:
Import the design into CAM software. The text must be converted into vector paths (centerlines or outlines) that the software uses to generate toolpaths.
3. Select the Toolpath:
Choose the appropriate machining strategy, most commonly Engraving (for following lines) or Pocketing (for clearing areas).
4. Define Cutting Parameters:
Set the critical machining data:- a. Spindle Speed: A high RPM is crucial. 6,000 RPM or higher is recommended, with many applications benefiting from 12,000 RPM or more for fine detail.
- b. Feed Rate: The speed at which the tool moves through the material. This must be calibrated to the tool, material, and spindle speed to avoid tool breakage or poor finish.
- c. Depth of Cut: Set according to your design guidelines (e.g., 0.3 mm).
5. Simulate Toolpaths:
Always run a simulation to check for errors, verify tool movement, and prevent collisions.
6. Post-Process and Run:
The CAM software generates the G-code specific to your CNC machine. After a final check or "dry run," the job is executed.Material-Specific Considerations for CNC Engraving
The choice of material directly influences tool selection and machining parameters.
Metals (Aluminum, Steel, Brass)
Characteristics:
Metals require high spindle speeds and careful control of the depth of cut to avoid excessive tool wear.Tooling:
Carbide tools with appropriate coatings (like Amorphous Diamond for aluminum) are preferred for longevity.Cooling:
Use coolant to manage heat and clear chips.
Plastics (ABS, PC, Acrylic)
Characteristics:
Softer plastics are easy to cut but sensitive to heat. Excessive heat can melt the plastic, causing a poor surface finish and material gumming up on the tool.Tooling:
Use very sharp tools, often with polished flutes.Cooling:
An air blast is often more effective than liquid coolant for clearing chips and preventing heat buildup.
Other Materials (Wood, Composites)
Wood:
Softer woods require deeper cuts and larger tools to hold detail. V-bit carving is very popular for wood signage.Composites:
Materials like carbon fiber are highly abrasive and cause rapid tool wear, requiring specialized, wear-resistant cutters.
Tool Selection and Best Practices for Optimal Results
Choosing the right engraving tool is critical for quality and efficiency.
Types of Engraving Cutters
V-Bits:
The most common choice for text. They have a pointed tip and are defined by their included angle (e.g., 60° or 90°). A smaller angle creates finer detail, while a larger angle creates a wider, more visible groove.Engraving Cutters:
These are typically solid carbide tools with a defined tip geometry. Avoid the cheapest flat-ground cutters, as their single flute and sharp tip are fragile. Opt for tools with a small radius on the tip (e.g., 0.0025") and multiple flutes for better durability and productivity.Ball End Mills:
While not as sharp as V-bits, small ball end mills (like 1/32") are very durable and excellent for engraving in metals and plastics where extreme sharpness is not required.
Pro Tips for Success
Ramp Into the Cut:
Instead of plunging straight down, program the tool to ramp into the material at a 1°-3° angle for metals and 3°-10° for plastics. This protects the fragile tool tip.Minimize Runout:
Use a high-quality, clean tool holder (like a shrink-fit) to minimize tool runout. Excessive runout causes uneven wear, poor finish, and premature tool failure.Secure Workholding:
The workpiece must be held firmly to prevent any vibration or movement during the engraving process.
FAQ's on Text Milling and CNC Engraving
What is the easiest font to use for CNC engraving?
The easiest fonts are sans-serif styles like Arial or Verdana. For small text and serial numbers, single-line fonts are the most efficient as they drastically reduce machining time.
What software is used for CNC text engraving?
The process typically involves:
- CAD Software (e.g., SolidWorks, Fusion 360) to create the design.
- CAM Software (e.g., Carbide Create, Fusion 360 CAM) to generate the toolpaths and G-code. Some software, like TextMilling, is dedicated specifically to this task.
Should I engrave before or after surface treatment (like anodizing or painting)?
Generally, engrave before surface treatment. Machining through an anodized layer exposes raw, unprotected metal, ruining the corrosion resistance. For paint and powder coating, engraving beforehand allows you to "fill" the text with paint for a contrasting look.
Can you engrave with any CNC machine?
Yes, almost any CNC router or milling machine can be used for engraving. However, machines with high-speed spindles (over 12,000 RPM) and high accuracy will produce the best results, especially with small tools and fine details.
What is the difference between centerline and outline engraving?
Centerline engraving is where the tool follows the center of the text stroke, like a pen. It's fast and ideal for small text. Outline engraving is where the tool cuts around the outside of the text characters, creating a more pronounced, bolder look.
Conclusion
Text milling and CNC engraving are powerful technologies that merge digital design with physical manufacturing to create permanent, high-precision markings. By understanding the fundamentals of the process, adhering to key design guidelines, and selecting the right tools and parameters, engineers and manufacturers can leverage this capability to enhance product identification, ensure traceability, and add valuable aesthetic details. Whether you're marking a prototype or a production run, mastering text milling is a crucial skill in modern manufacturing.